Streamlines in Unreal Engine #Part 1 – Basics
Intro
VirtualCity@Chalmers strives to incorporate numerous research fields into the virtual world of Unreal Engine 4 (UE4). You can read more about the current aims of VirtualCity@Chalmers project on our homepage1.
Major part of coupling computational science and game technology is the ability to visualise physical properties in an abstract gaming environment. Towards that goal, we will be introducing a multiple part series of a proposed way of visualising flow streamlines in UE4. Our tools of choice, where one can actually have a choice, is C++ instead of blueprints, for various reasons explained throughout the text.
Before the real implementation starts, we will try to easy in the learning curve by introducing some basic aspects of UE4.
Download and installation of UE4
If you have never worked with UE4 before, creating an account and installing the software is needed. You can read about it here2.
Setting up a proper .gitignore
Since we are committing our work to our git repository3, it is vital that keep the pushes as small as possible. If you are not familiar with git, feel free to have a look 4.Having a proper .gitignore is important, in saving bandwidth, time and energy. Below you can find the .gitignore file we are currently using; The first part includes directories UE4 creates locally, so they should not be committed, specially since they might be very large in size, depending their origin and purpose of being. The second part refers to standard Visual Studio (VS) created files. Again they can, and actually should, be safely ignored while pushing data. Last two parts are related to non-VS IDE versions, i.e. Linux and Xcode.
|
1 2 3 4 5 6 7 8 9 10 11 12 13 14 15 16 17 18 19 20 21 22 23 |
# UE4 Project directories to ignore *.txt Binaries/ DerivedDataCache/ Intermediate/ Saved/ Build/ *.VC.db # Visual Studio solutions *.sln *.sdf *.opensdf *.suo # Linux Project files /*.pro /*.kdev4 /CMakeLists.txt /Makefile # Xcode Project files /*.xcodeproj |
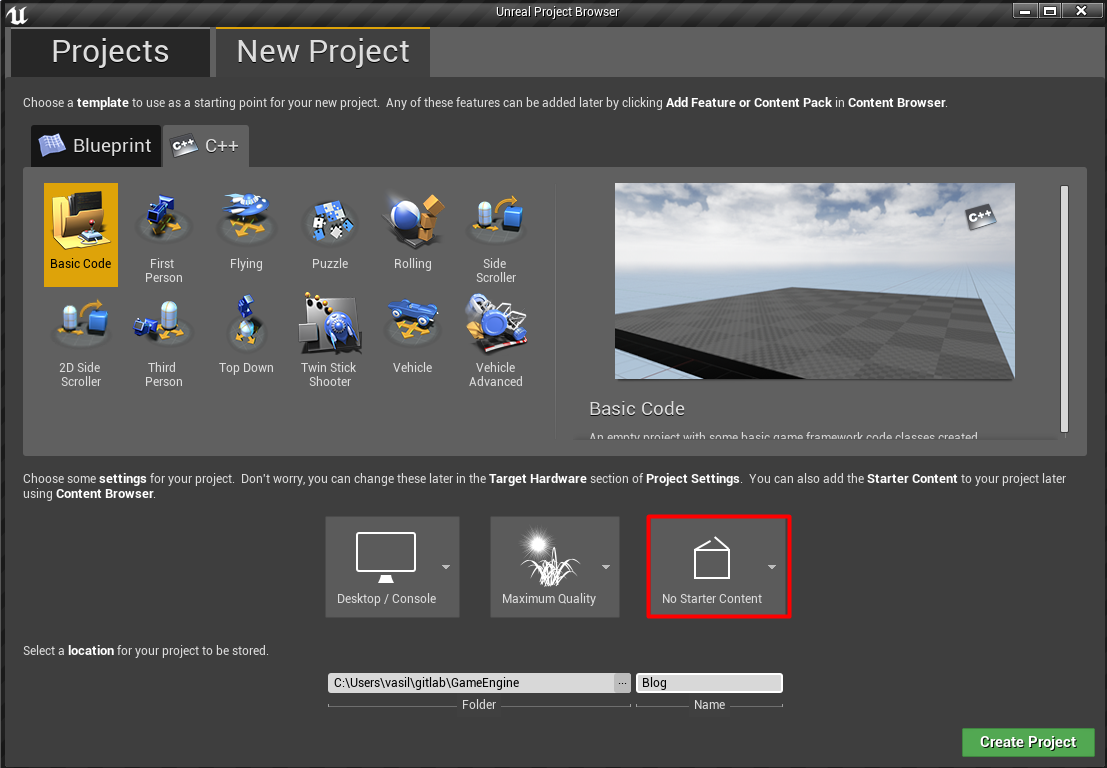
Setting up a proper empty level/workspace in Unreal Engine
Starting fresh will help to keep things tidy. It is very easy to get lost while looking into all the premade UE4 tutorials or starter content. To avoid that, we begin by creating an empty C++ project with no content from the UE4 launcher menu 5.
A brief introduction to UE4 classes of interest
We feel that before you jump deeper into our project, you need to have a basic understanding of some of the most used classes in Unreal Engine 4 as this will come in handy later on 6. Some of the commonly used classes in Unreal Engine are:
- UObject
- AActor
- UActorComponent
The UObject class is the base class for all objects in Unreal’s API. In case you’re familiar with Java or C# think of it as the “Object” class.
The AActor class is derived from the UObject class. Actors in Unreal Engine 4 are entities that can be spawned inside our game’s world. For example, a building or even the Sky that you as a user see in the virtual world is an Actor that is defined by various properties. These properties include information such as the Actor’s position, rotation and scale in the 3D world space.
However, depending on each Actor’s behavior, we may have to split its various properties into multiple components in order to make our code more flexible, efficient and maintainable. The UActorComponent class is the base class for components in Unreal Engine and its used to define reusable behaviors that can be added to different types of Actors. For example, we may have hundreds of different buildings inside our level, but essentially their only difference would be that the component which describes the geometry contains a unique mesh for each building.
Continue to Part 2.